


Build, train and use your own AI models in the terminal, without writing any code.
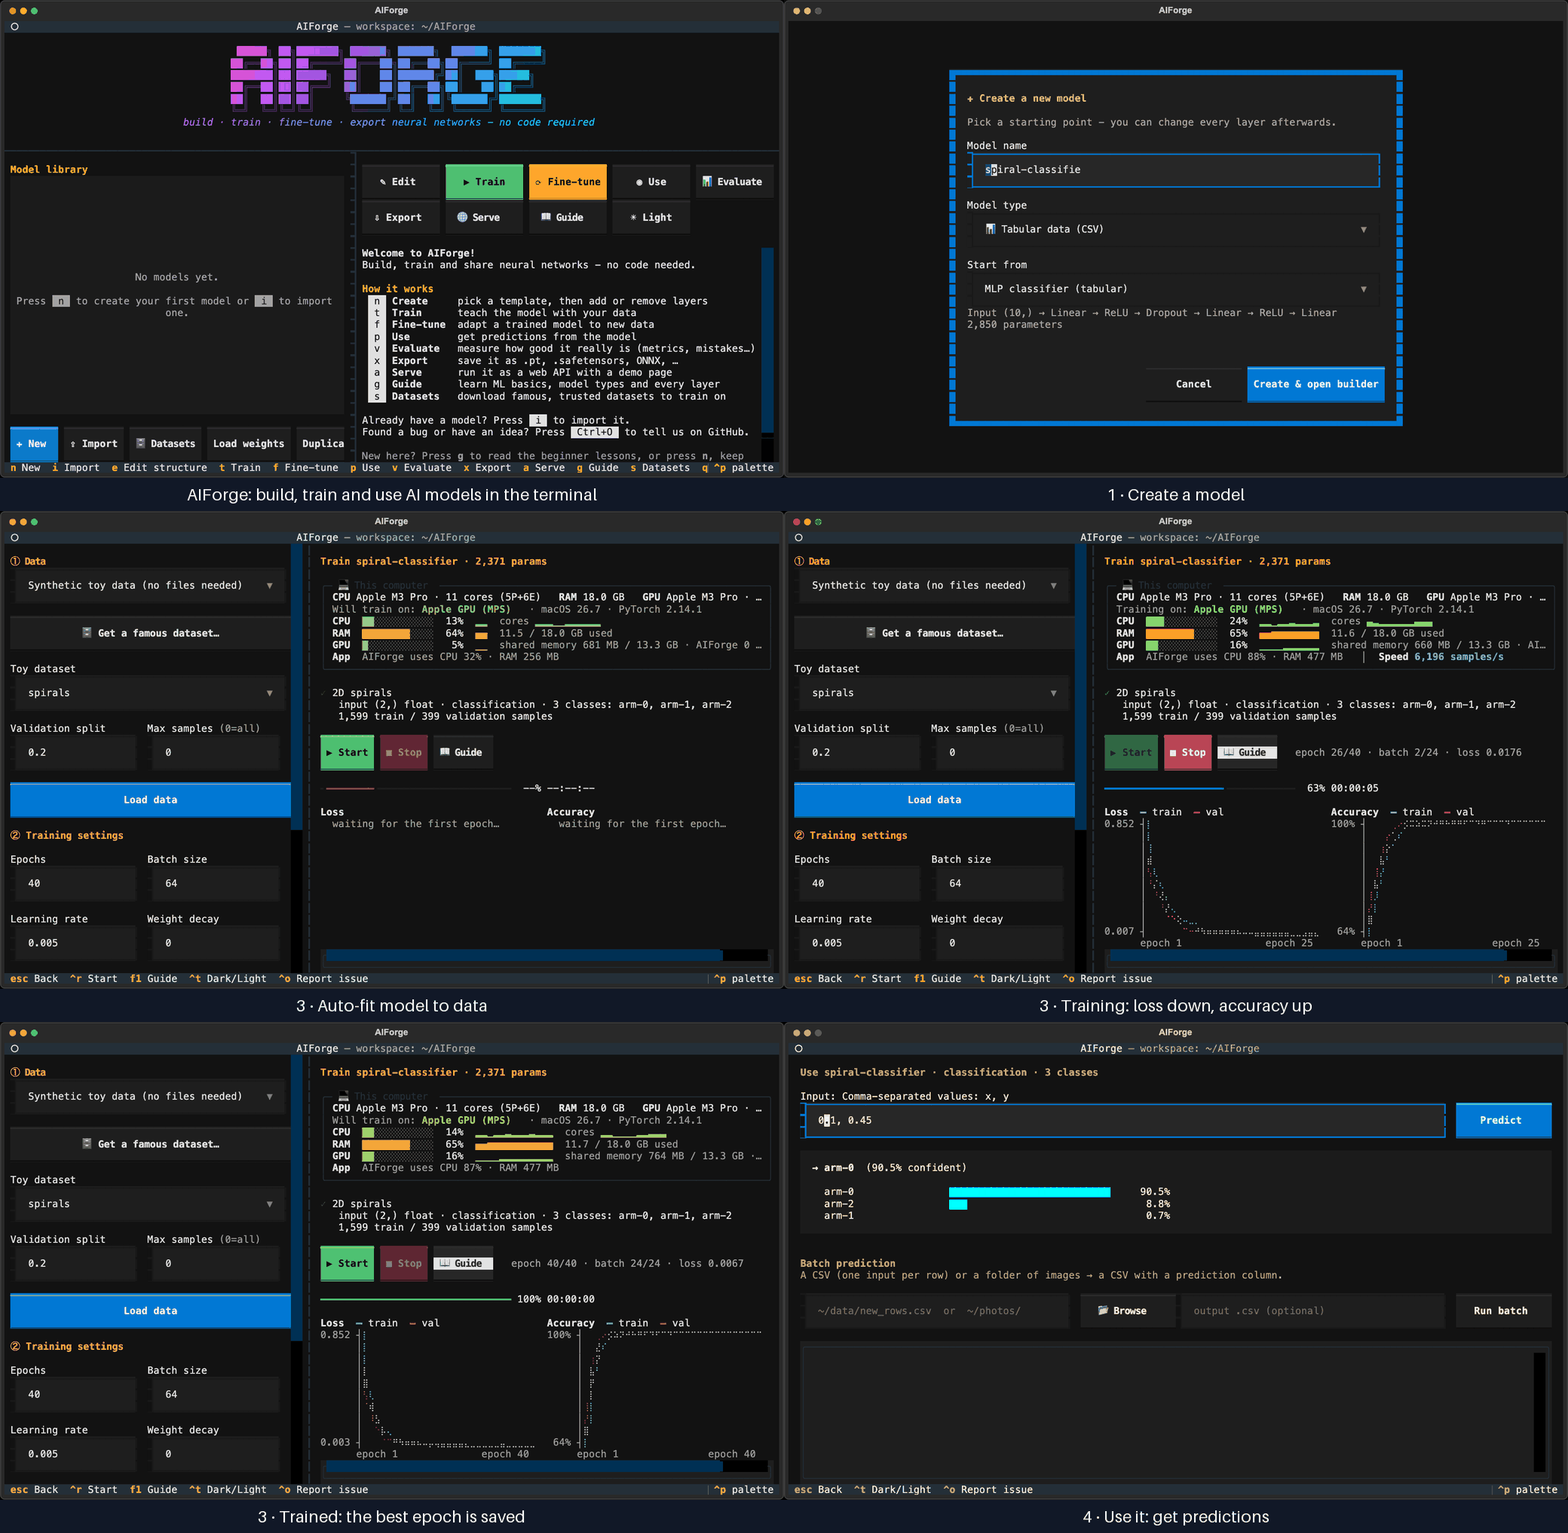
With the mouse or keyboard you can:
- Design a neural network by picking layers from a list
- Train it on a CSV table, text, images, or a famous public dataset
- Fine-tune a trained model for a new, related task
- Evaluate how good it really is
- Use it to make predictions, or let a tiny GPT write text
- Find structure without labels: groups (k-means), a 2-D map (PCA) and oddities (autoencoders)
- Train an agent that learns from rewards (reinforcement learning), then watch it play
- Export it for Python, ONNX Runtime, mobile apps and more
No PyTorch or Python knowledge needed. The built-in Guide (g) teaches the ML basics.
⭐ If AIForge helps you, please star it on GitHub. It helps other people find the project and keeps it going.
- Install
- Quick start: your first model in 5 minutes
- The screens
- Data
- Which template should I choose?
- Reading the training charts
- Keyboard shortcuts
- Troubleshooting
- Where are my files?
- Command line (no UI)
- Web API: use your model from other programs
- For developers
You need: Python 3.10+, disk space for PyTorch (about 1 GB on macOS and Windows; several GB on Linux, or about 1 GB with the CPU-only build), and a terminal window of at least 120 × 35. A GPU is optional: NVIDIA (CUDA) and Apple Silicon (MPS) are used automatically.
Open Terminal (macOS, Linux) or PowerShell (Windows), paste one line and press Enter:
# macOS and Linux
curl -LsSf https://raw.githubusercontent.com/ducdinh-codehub/ai-forge/main/install.sh | sh
# Windows (PowerShell)
irm https://raw.githubusercontent.com/ducdinh-codehub/ai-forge/main/install.ps1 | iexThen open AIForge like any app: from Applications/Launchpad (macOS), the app menu (Linux), or the Start Menu and Desktop (Windows). The first install takes a few minutes: it downloads Python and PyTorch (about 200 MB to 1 GB). Run the same line again to update.
It installs for you only: no admin password, and no system files are changed. It installs uv, a private copy of Python and AIForge, then adds the icon. Read the script first if you like: install.sh · install.ps1.
Uninstall (your saved models in ~/AIForge are kept):
curl -LsSf https://raw.githubusercontent.com/ducdinh-codehub/ai-forge/main/install.sh | sh -s -- --uninstall$env:AIFORGE_UNINSTALL = 1; irm https://raw.githubusercontent.com/ducdinh-codehub/ai-forge/main/install.ps1 | iexpipx install aiforge-studio # or: pip install aiforge-studio
aiforge # start the appOn Linux, PyTorch comes with NVIDIA's GPU libraries by default: a download of over 2 GB. Without an NVIDIA GPU you don't need them. The CPU-only build is about 200 MB:
pipx install aiforge-studio --pip-args="--extra-index-url https://download.pytorch.org/whl/cpu"
# or, in a virtual environment:
pip install aiforge-studio --extra-index-url https://download.pytorch.org/whl/cpu
macOS and Windows already get the small build (Apple GPUs work with it), so this isn't needed there.
No pipx yet? / NVIDIA GPU stats / install from source
# Install pipx once, then reopen the terminal
python3 -m pip install --user pipx && python3 -m pipx ensurepath

# Show GPU usage and temperature on NVIDIA cards
pipx inject aiforge-studio nvidia-ml-py

# Update later
pipx upgrade aiforge-studio

# From source (developers)
git clone https://github.com/ducdinh-codehub/ai-forge.git && cd ai-forge
python3 -m venv .venv && .venv/bin/pip install -e .
.venv/bin/aiforge                # Windows: .venv\Scripts\aiforge
Moving around: click with the mouse, or press the keys shown in the bottom bar.
Tab = next box · Enter = confirm · Esc = back · q = quit.
You'll teach a model to tell apart three spirals of points. The data is built in.
On the first launch AIForge offers to walk you through these steps, highlighting what to press
(restart the tour any time with F2).
| Step | Do this |
|---|---|
| 1. Create | Press n. Name it spiral-classifier, keep Tabular data → MLP classifier, click Create & open builder. |
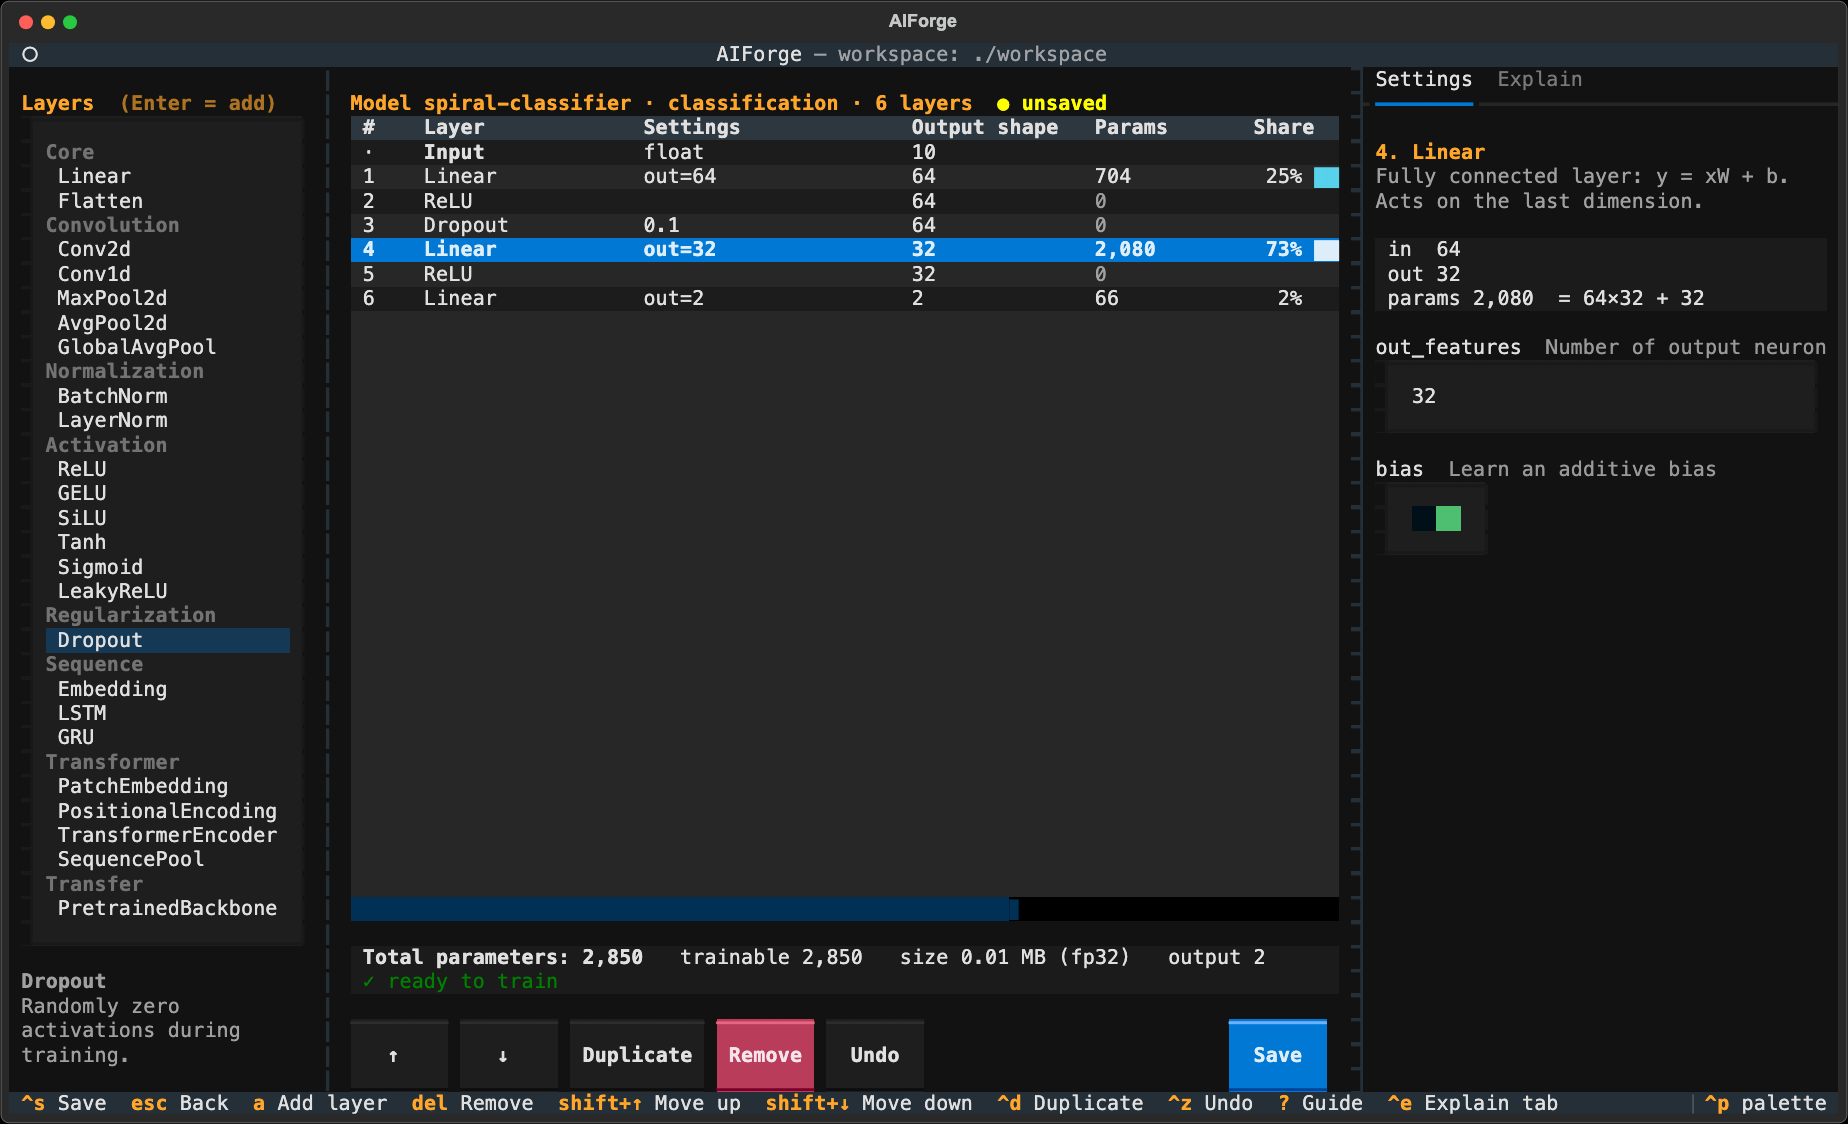
| 2. Look | The builder shows every layer, its shape and parameter count. Press Ctrl+S, then Esc. |
| 3. Train | Press t. Choose Synthetic toy data → spirals, click Load data, then Auto-fit model to data. Set Epochs 40, Learning rate 0.005, click ▶ Start. |
| 4. Use | Press p, type 0.1, 0.45, press Enter. The model answers arm-0. |
| 5. Export | Press x, tick formats with the space bar, click ⇩ Export. |
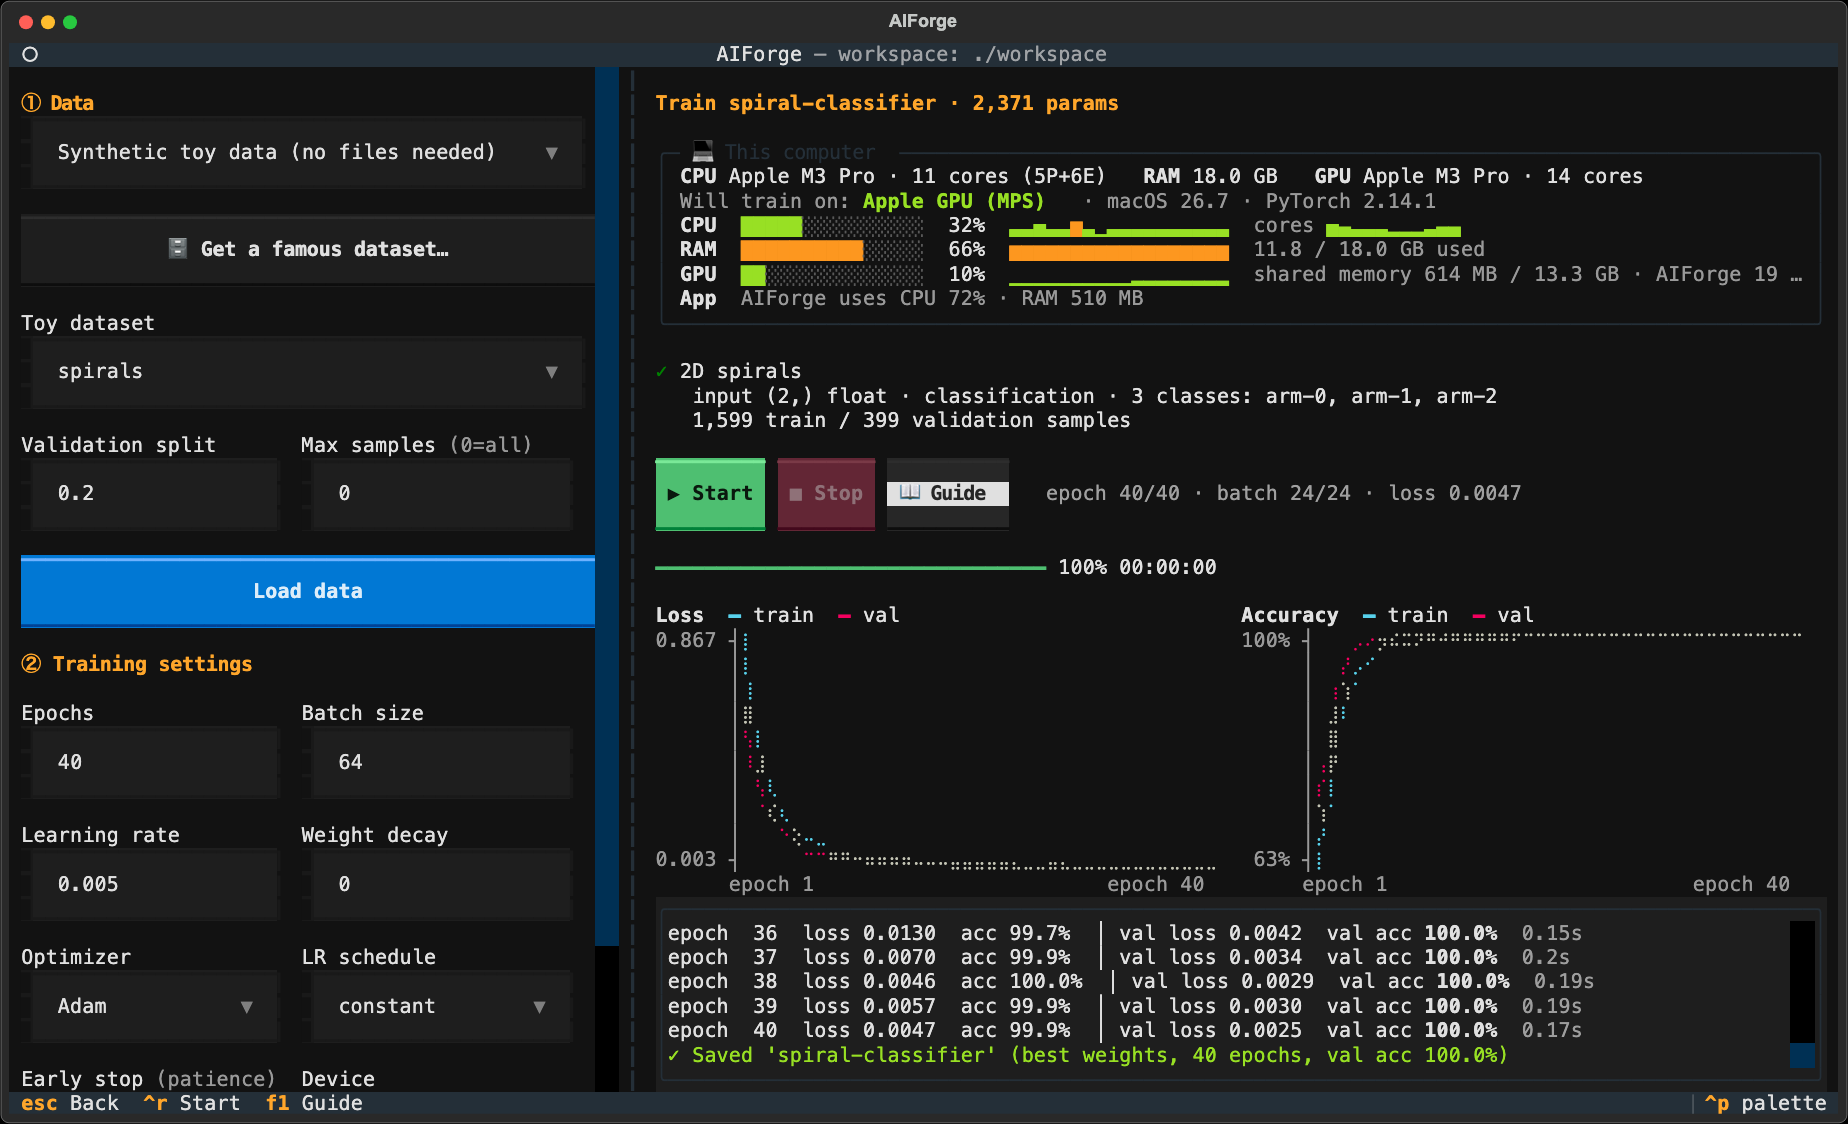
Loss going down and accuracy going up means it's learning. AIForge always saves the best epoch. 🎉 You built, trained, used and exported a neural network without code.
Press n → ✨ Not sure? Just describe what you want (or Ctrl+P → goal wizard). Write the goal
in plain words, choose your data and click 🔮 Make a plan. For the data, 📂 Browse for your own
file or folder, or press 🗄 Famous dataset: with no data yet, AIForge suggests datasets that fit
your goal (predict house prices → California housing, detect spam → SMS Spam) and opens the
dataset hub on the best one.
| You write | With | AIForge picks |
|---|---|---|
| predict house prices | houses.csv |
regression on the price column, a table network |
| sort photos of cats and dogs | a folder with cats/ and dogs/ |
image classification, starting from a pre-trained network |
| is a review positive or negative? | reviews.csv |
text classification on the text and label columns |
| find 5 groups of customers | customers.csv |
k-means with 5 groups, no labels needed |
| write poems like these | poems.txt |
a tiny GPT |
| recognise handwritten digits · balance a pole | nothing | MNIST · a CartPole agent |
The plan says why it chose each thing and warns about problems (too few images, an ID column, a short text). Change the label column if it guessed wrong, then ▶ Create & train: the Train screen opens with the data loaded, the model fitted to it and the settings filled in.
Your models on the left, details and training history on the right. Every action has a button and a key (see shortcuts).
| I want to… | Do this |
|---|---|
| Add a layer | a, highlight a layer, Enter |
| Edit a layer | Select it, change the boxes on the right |
| Change the input (1D / 2D / 3D), type or task | Select the Input row, pick Input dimensions, fill in each size (e.g. 3D image: Channels 3, Height 64, Width 64) |
| Move · copy · remove a layer | Shift+↑/↓ · Ctrl+D · Del |
| Undo · save | Ctrl+Z · Ctrl+S |
| Learn what a layer does | Ctrl+E (Explain tab) or ? (full Guide) |
Mistakes show up in red right away. Layers you don't change keep what they learned.
-
① Data: choose a source and click Load data (see Data). A yellow warning means the model doesn't fit the data: click Auto-fit model to data. If the structure is wrong (e.g. a table model for images), 🔧 Fix model… offers checked fixes.
-
② Settings: the defaults are fine to start. Common ones:
Setting Meaning Start with Epochs Passes through the data 10–50 Batch size Examples per update 32–128 Learning rate Step size: too high = unstable, too low = slow. 🔎 Find LR suggests one 0.001 Early stop Stop after N epochs with no improvement (0 = off) 0 or 5 Device CPU or GPU auto Precision autotrains in mixed 16-bit precision on NVIDIA GPUs: often 2–3× fasterauto Data workers Processes that load images in the background ( auto: Linux, 1,000+ images)auto Seed Same seed, data and settings = same model. Empty = a new seed each run, saved in the history empty Balance classes Rare classes count more, so the model doesn't just favour the common one off -
Click ▶ Start (
Ctrl+R). Watch the charts, the log and the 💻 This computer panel (CPU, RAM, GPU usage, samples/s).
Not sure about the learning rate? Click 🔎 Find LR: a copy of the model trains for 100 batches while the rate grows from tiny to huge, the chart shows the loss for each, and the learning rate box is set to a tenth of the rate where the loss was lowest. Your model doesn't change.
Comparing settings fairly: each run's seed is shown in the log and the history. Type the same Seed for two runs and the setting you changed is the only difference between them.
Pause and resume: ■ Stop saves the best epoch so far, and the run can be continued later. If training stops early (Stop, a crash, closing the app), the Train screen shows ⏯ Resume: the run carries on from its last finished epoch with the same data and settings, as if it had never stopped. ▶ Start begins a new run instead.
Press F1 for the 📖 Guide panel: a live diagnosis of your run ("✅ healthy",
"
Like Train, plus: freeze layers you want to keep (try Freeze all but head), optionally reset the output layer, and save under a new name so the original stays safe.
| Model trained on | Type |
|---|---|
| A table | Values in column order: 6, 3.5, red |
| Text | A sentence: what an amazing movie |
| Images | An image path: ~/Pictures/cat.jpg |
| Plain text (language model) | The start of a text: Twinkle, twinkle. The model writes what comes next; set the length and temperature (low = safe, high = creative) |
Give it a whole CSV or image folder for batch prediction (writes a CSV with predictions).
🔍 Explain (Ctrl+E) shows why the model gave its answer: which features or words pushed
it towards the answer (green) or away from it (red), and for images a heat map of where it looks.
Command line: aiforge explain spiral "0.1, 0.45".
Press v (📊 Evaluate), choose the data (the validation / test data from training, or a
separate file or folder with the true answers) and click ▶ Evaluate (Ctrl+R). The report:
| Section | What it shows |
|---|---|
| Verdict + warnings | Strong / Good / Weak / Not useful, plus e.g. "classes are imbalanced: accuracy is misleading" |
| Metrics vs. a baseline | Classification: accuracy, balanced accuracy, F1, ROC-AUC, PR-AUC, log loss, calibration. Regression: MAE, RMSE, MSE, R², MAPE. Language model: perplexity, next-token accuracy, bits per token. With 95% confidence intervals. |
| Per class · confusion matrix · calibration | Which classes it gets wrong, mixes up, or is over-confident about |
| Error analysis | Its worst mistakes, with the actual example (row values, text or file name) |
| Slices | Results per group of each category column in a table (fairness check) |
| Robustness · learning curves | Score with noisy inputs; over- or underfitting from the training history |
| Compare with another model | Which of two models is better, with a significance test |
| Language models | Samples of what it writes at 3 temperatures, and the tokens it finds hardest |
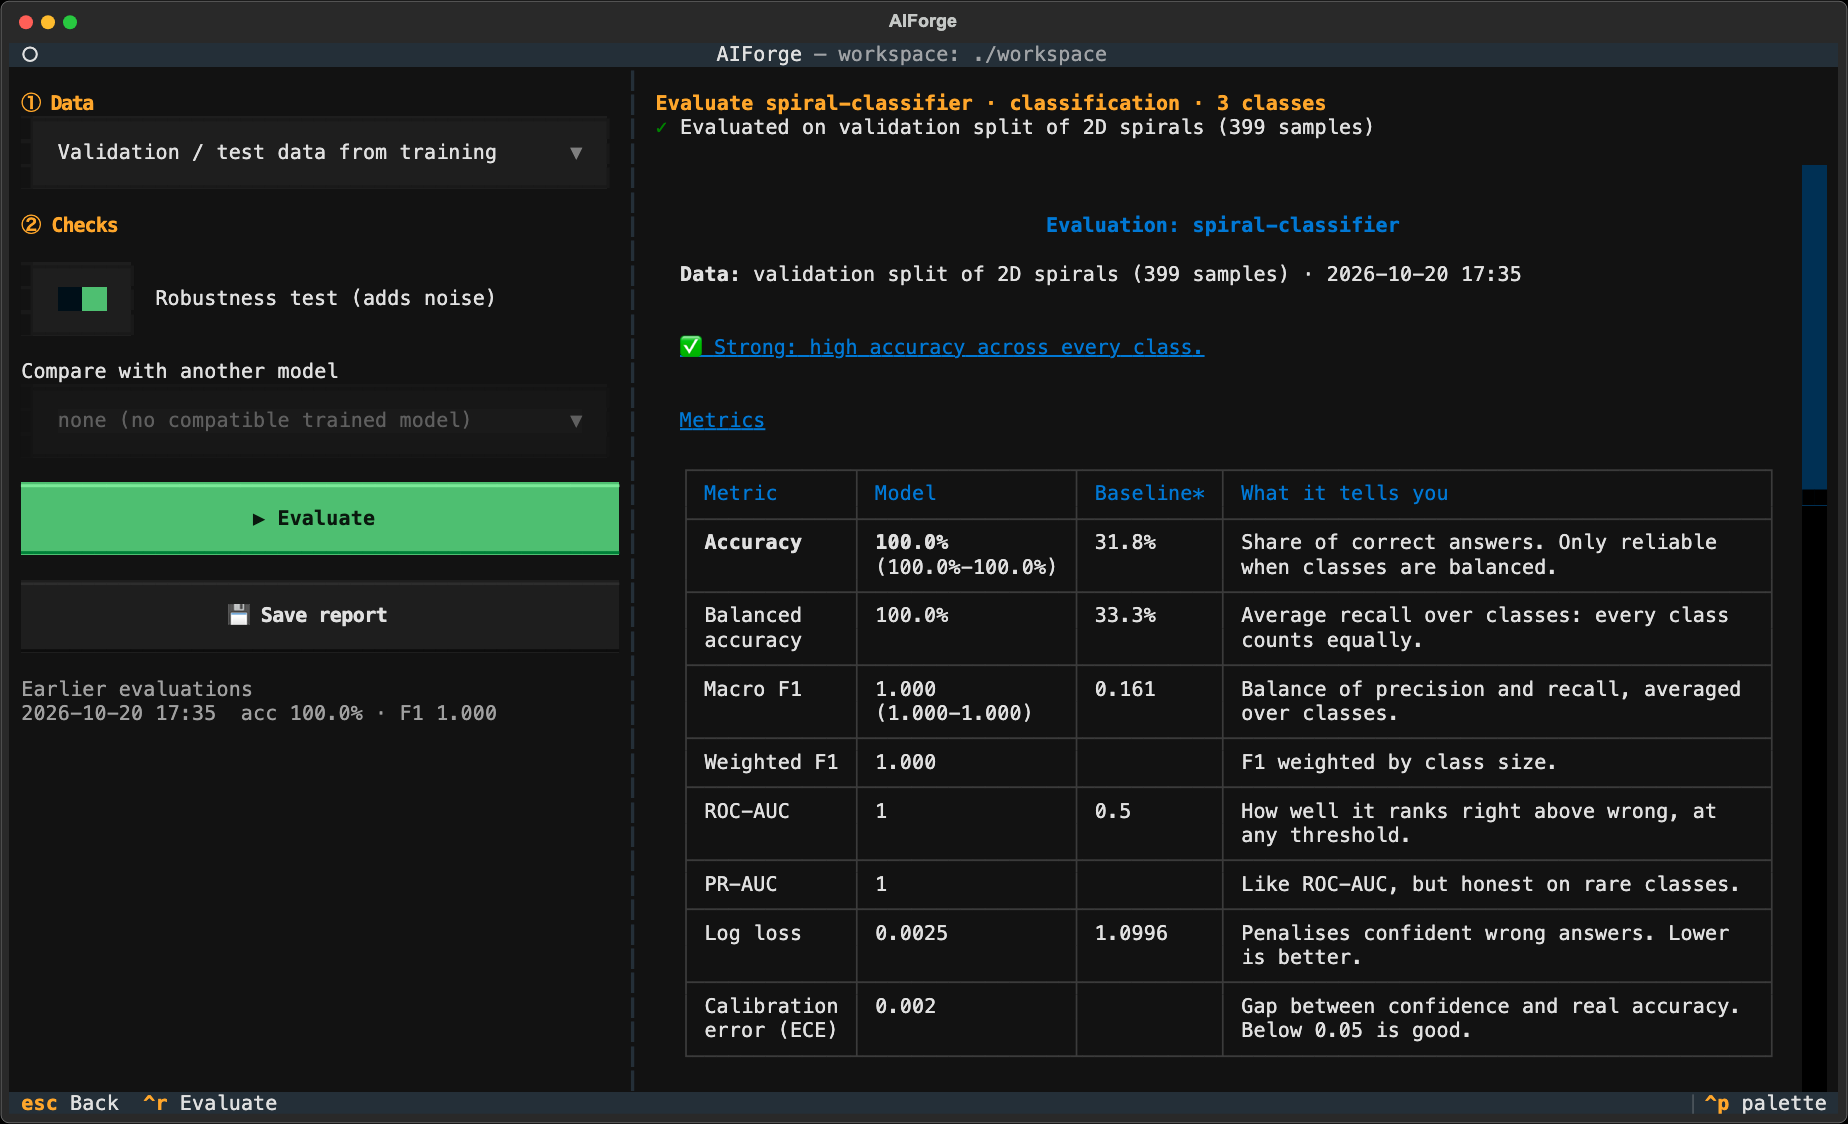
💾 Save report writes it to exports/<model>/ as Markdown and JSON. The home screen shows
the last result. New to the metrics? Press g → 7. Is my model good?
Press m (📈 Compare). Tick training runs, of one model over time or of different models on
the same data, to see their curves on one chart and a table of the best and last scores. Only the
settings that differ are shown, so you see what made the difference; the best run gets a ★.
Command line: aiforge compare small big --metric val_acc.
| Format | Use it to… |
|---|---|
AIForge bundle .zip |
Back up or share with another AIForge user |
Weights .pt / .safetensors |
Load in your own PyTorch / Hugging Face code |
PyTorch code .py · JSON · summary |
Read, edit or document the model |
Training script .py |
Re-train it with plain PyTorch: its data loading, settings and training loop, ready to edit |
| TorchScript · ONNX | Run in C++, mobile, ONNX Runtime, TensorRT, browsers… |
a (or 🌐 Serve) starts a small web server for the selected model: a demo page to try it in
the browser and a JSON API other programs can call. Only your computer can reach it, and it stops
when you close the window. Step-by-step: Web API.
Press i: AIForge bundles, .json, .safetensors, or a PyTorch nn.Sequential saved with
torch.save. .pt/.pth files are loaded safely: only supported layers are read, and a file
that tries to run code is refused.
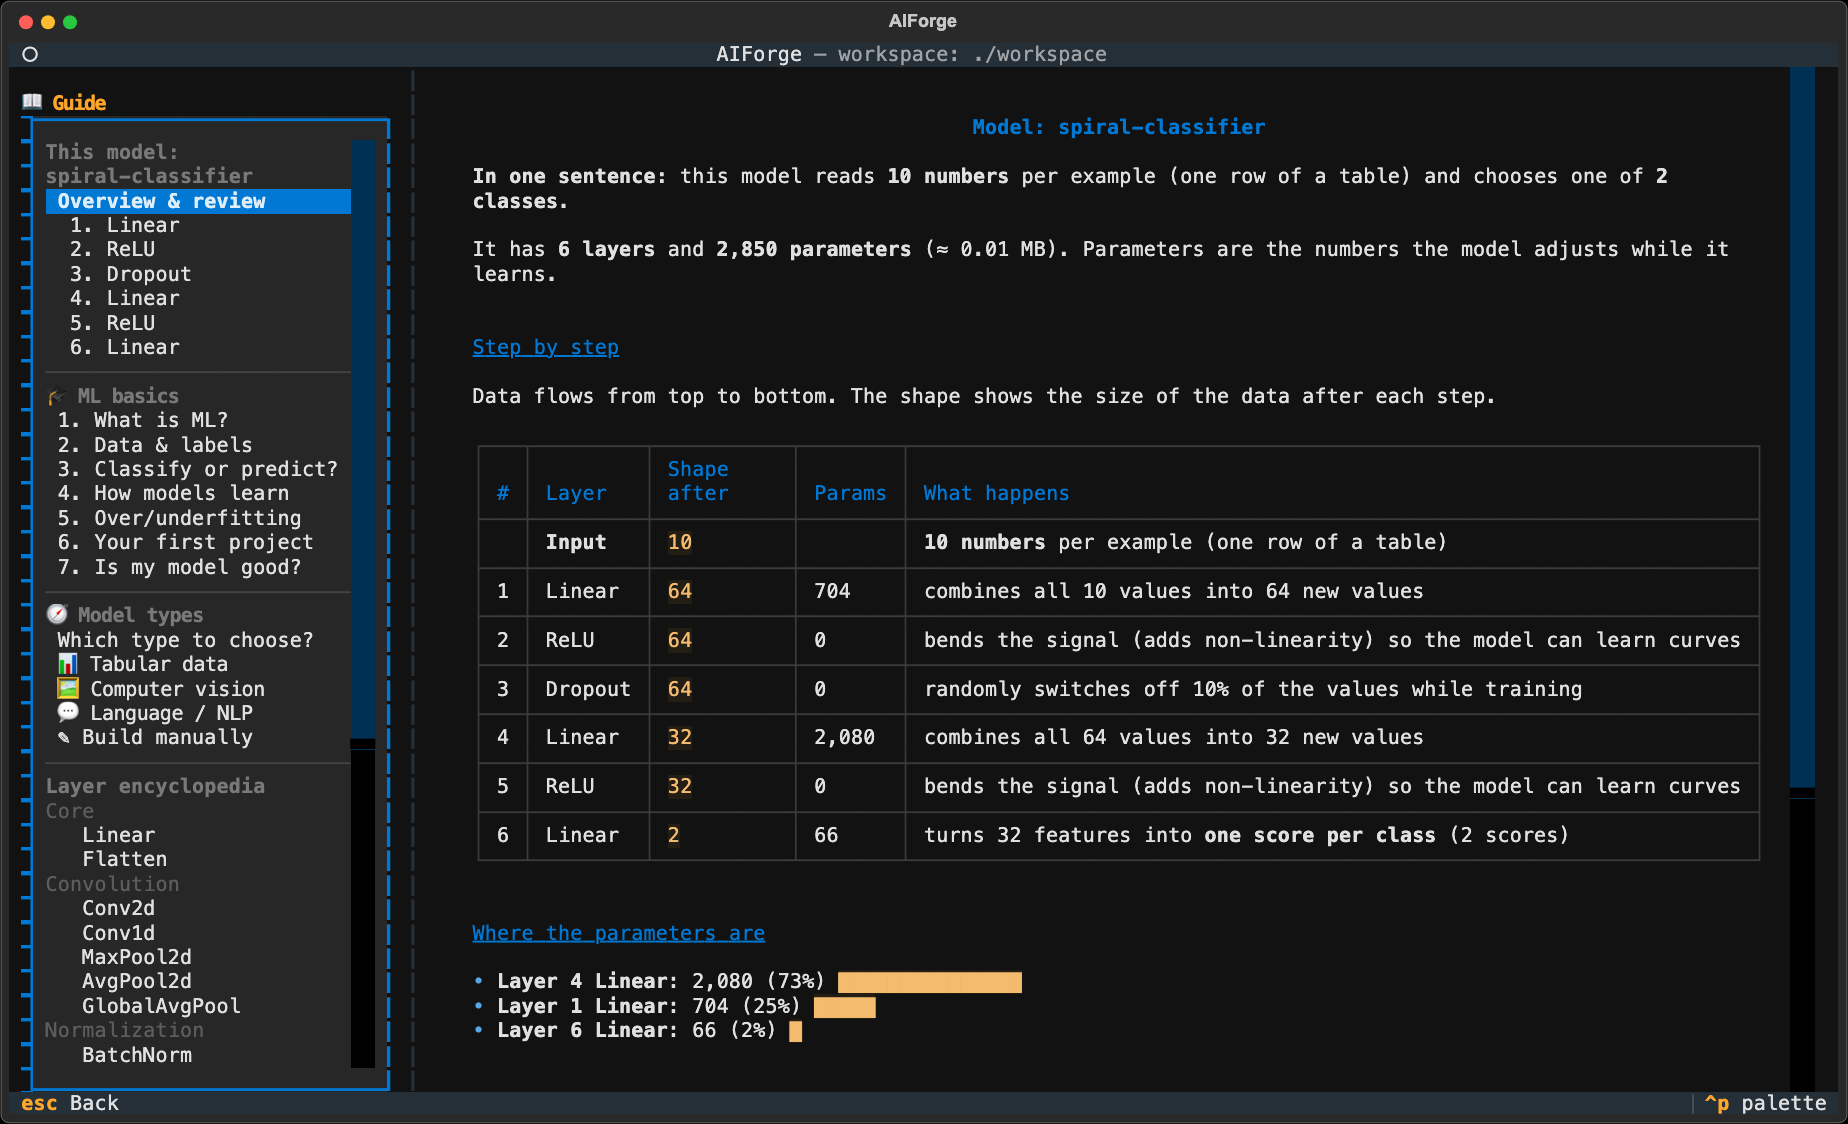
Press g. Beginner lessons (ML basics, model types), a step-by-step walk-through of your
model with a design review, and an encyclopedia of every layer.
Press Ctrl+O on any screen (or find Report a problem or idea in the Ctrl+P palette).
Choose bug / idea / question, write a title and what happened. AIForge opens GitHub's
New issue page with everything filled in; check it and click Submit (a free GitHub
account is needed, and nothing is sent before you submit). You choose what is attached:
- versions and hardware (AIForge, Python, PyTorch, OS, GPU)
- the error messages the app showed recently
- the open model's layers (structure only, never your data or weights)
- the crash details, if AIForge closed because of an error last time; it offers this at the next start
Your home folder is shown as ~ in paths. The report is also copied to the clipboard and
saved in exports/issue-reports/, in case no browser opens (e.g. over SSH).
Press * on the Home screen, click star it on GitHub in the welcome text, or pick Star AIForge
on GitHub in the Ctrl+P palette. AIForge opens the project page in your browser and you click
⭐ Star there (it never touches your GitHub account). After your first successful training it
asks once; Maybe later asks again five trainings later, Don't ask again means never.
Press s on the home screen (or 🗄 Get a famous dataset… on the Train screen). Pick one,
press ⇩ Download, then ▶ Train on it. AIForge fills in all the fields and loads it.
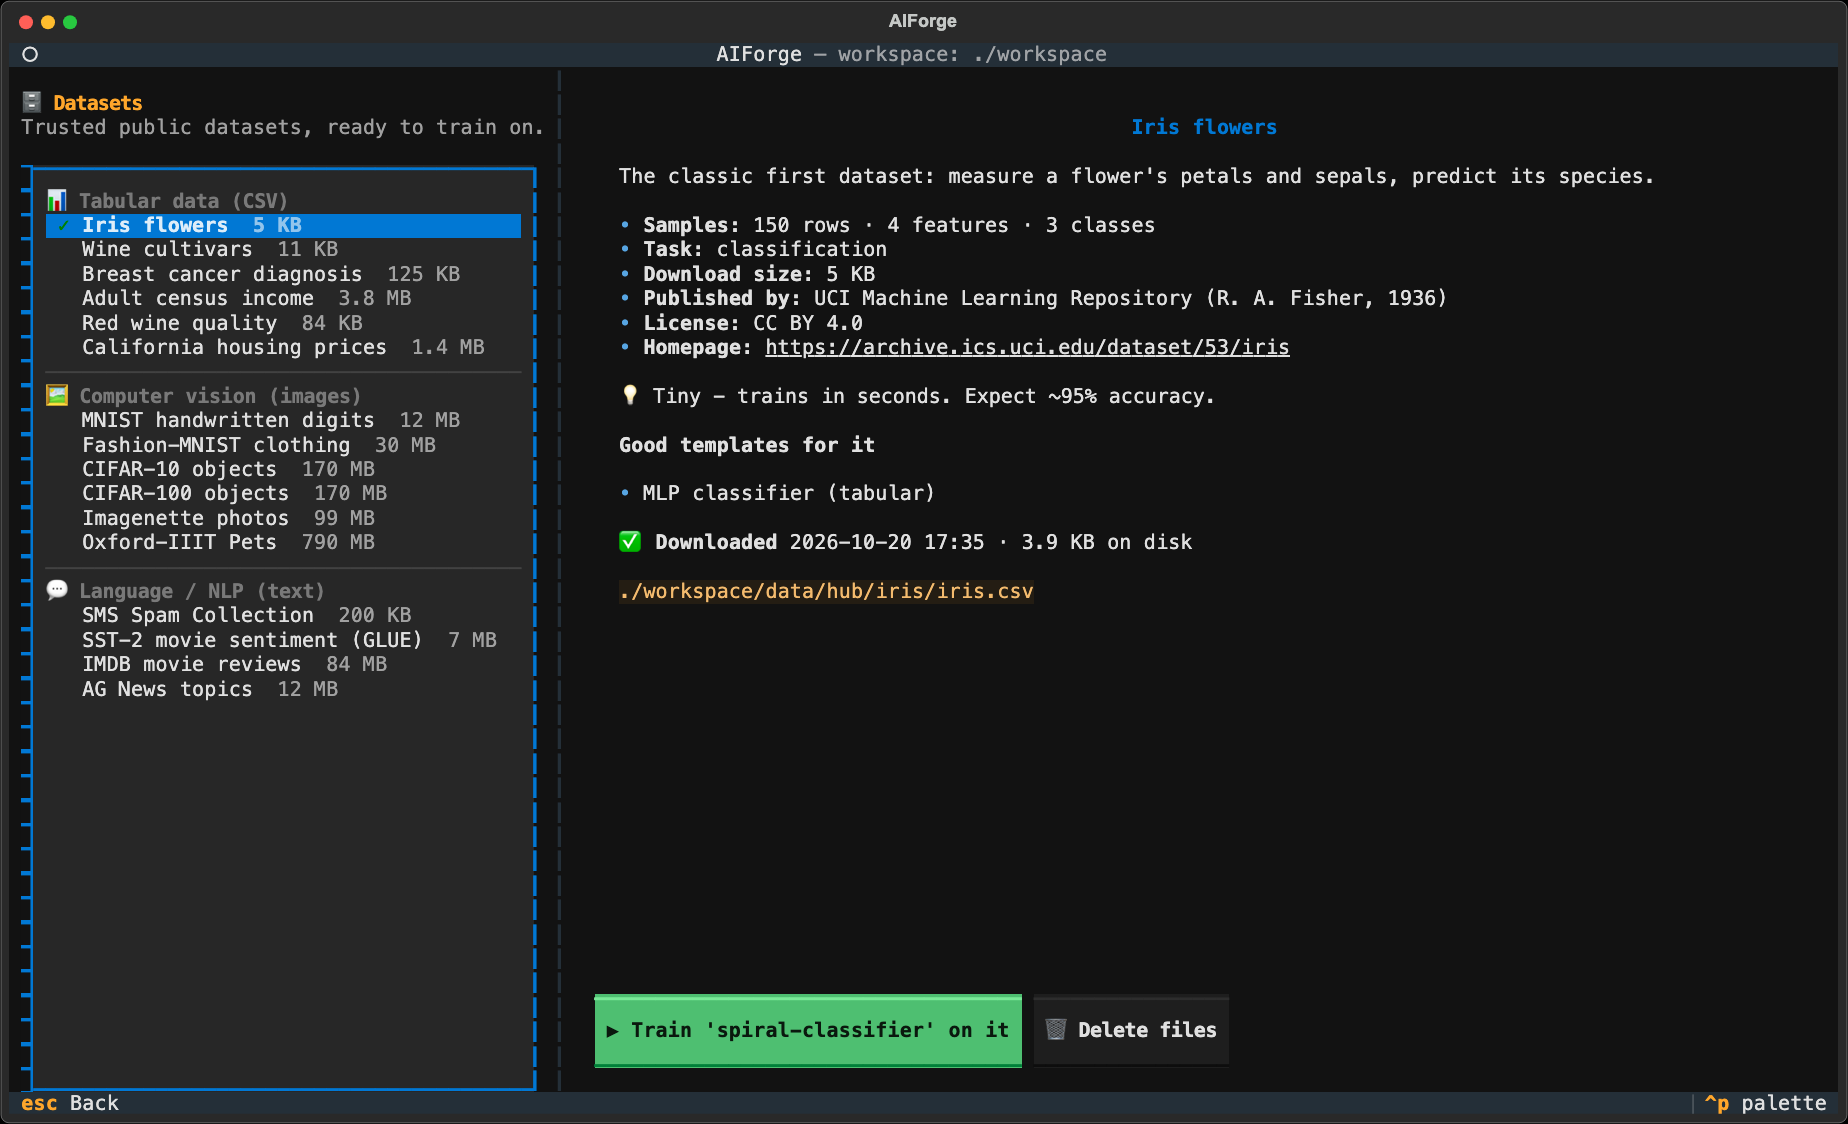
| Model type | Datasets |
|---|---|
| 📊 Tabular | Iris · Wine · Breast cancer · Adult income · Red wine quality · California housing |
| 🖼 Vision | MNIST · Fashion-MNIST · CIFAR-10 · CIFAR-100 · Imagenette · Oxford-IIIT Pets |
| 💬 Text classification | SMS Spam · SST-2 · IMDB reviews · AG News |
| 🧠 Language model | Tiny Shakespeare |
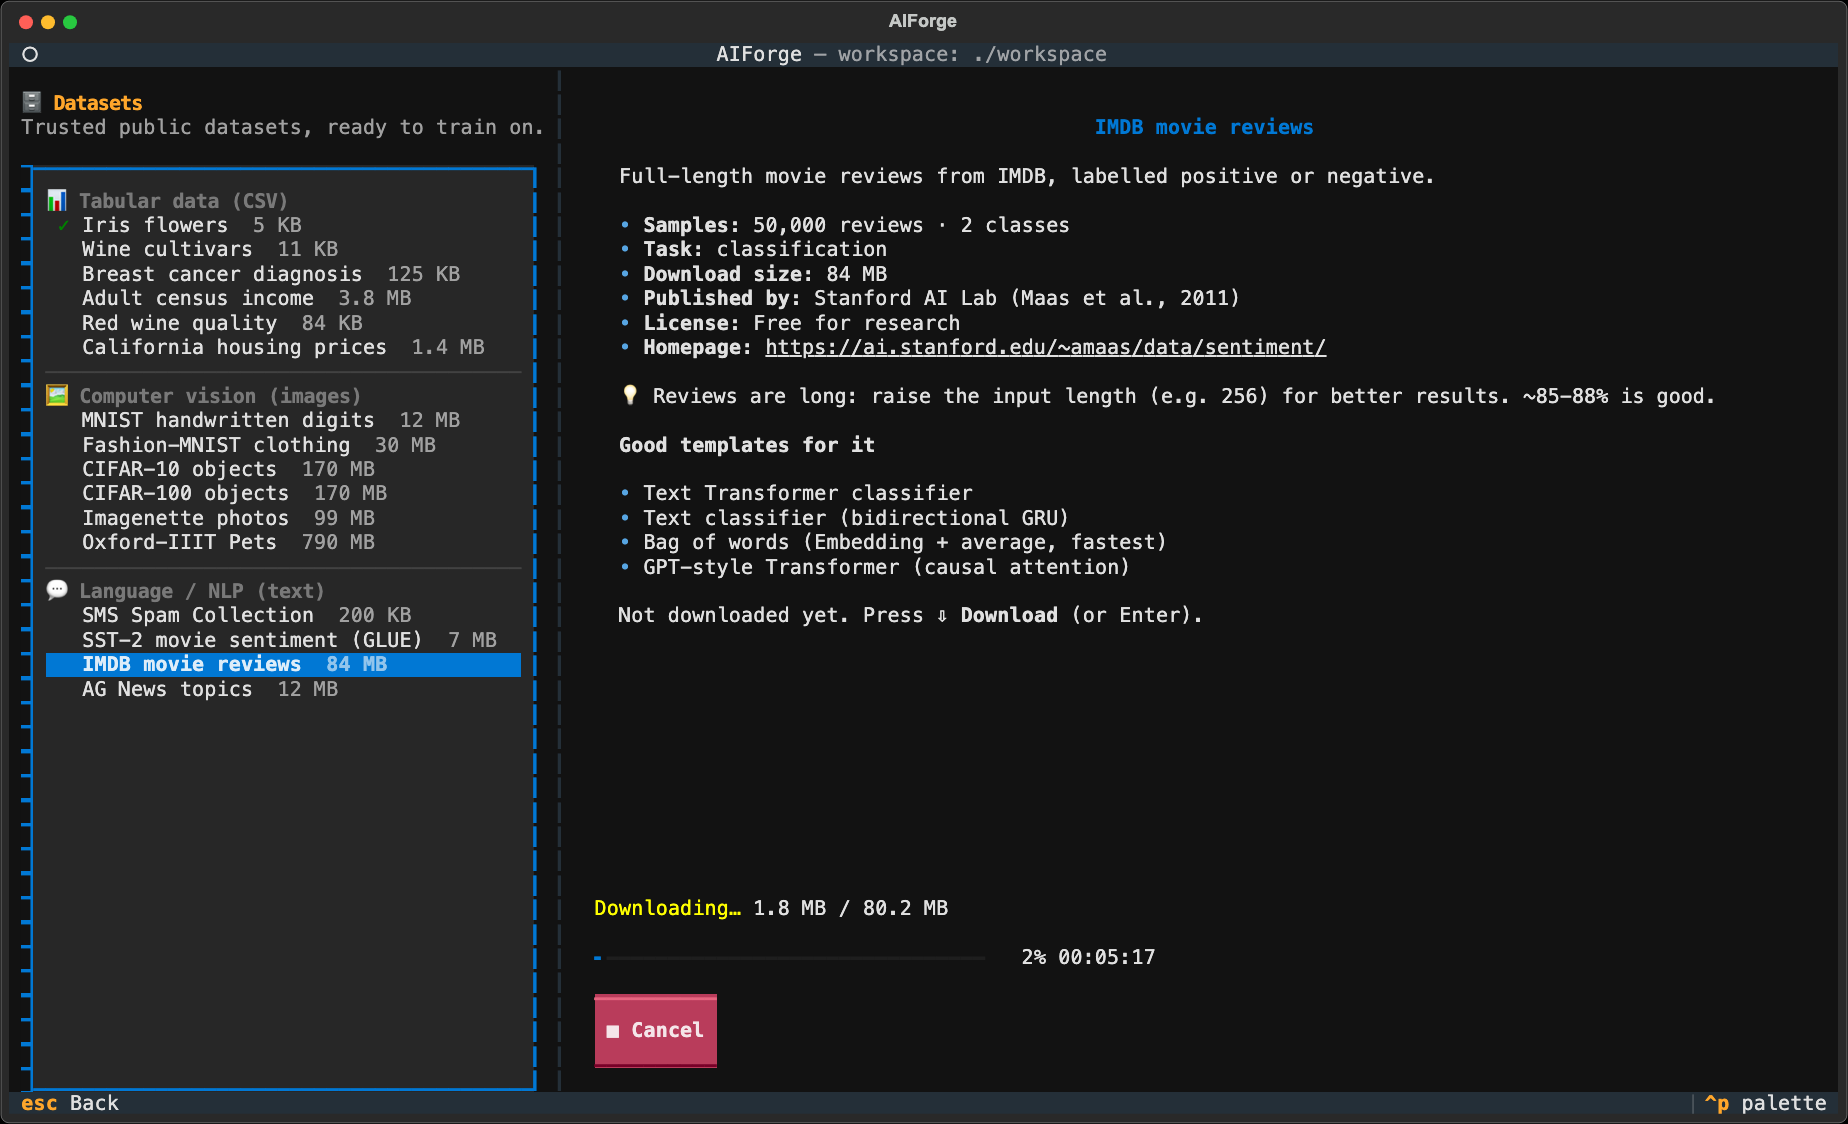
All come from their official sources (UCI, Stanford, Oxford, U. Toronto, Zalando, fast.ai). Each one shows its publisher, license, size and the templates that suit it. Downloads show their progress and can be cancelled:
Click 📂 Browse to pick a file; the preview shows its columns or classes. Sample files are under 📦 Examples in the browser.
| Kind | Format |
|---|---|
Table (CSV, Excel .xlsx, Parquet) |
One row per example. The last column is predicted (or choose another). Text columns and missing numbers are handled for you. |
| Text (table) | A text column and a label column: "great movie",pos |
| Images | A folder with one sub-folder per class (cat/, dog/). Images are resized automatically. |
| Images listed in a table | A column of image paths (relative to the table) and a label column: photos/1.jpg,cat |
| Plain text (.txt) | Any text for a language model to imitate: a book, poems, lyrics, code. Split into characters or words. A short sample (nursery_rhymes.txt) is built in; aim for 1 MB+ for real sentences. |
Choose Hugging Face dataset as the source and type its name from
huggingface.co/datasets, e.g. imdb or uoft-cs/cifar10
(command line: -d hf:imdb). AIForge reads it as images, text or a table to suit your model,
and keeps the dataset's class names.
Excel, Parquet and Hugging Face need a few extra packages: pipx inject aiforge-studio openpyxl pyarrow datasets
(or pip install "aiforge-studio[data]").
How much data? For images, aim for 50–100+ per class. With fewer, use a Transfer learning template.
| Your data | Template |
|---|---|
| 📊 Table → predict a category / a number | MLP classifier / MLP regressor |
| 🖼 Small grayscale images (28×28) | Small CNN |
| 🖼 Small colour images (32×32) | CNN (CIFAR-10) · ViT · Hybrid CNN + Transformer |
| 🖼 Your own photos, from scratch | Deep CNN (64×64) |
| 🖼 Photos, especially with few examples | Transfer learning: MobileNetV3 (fast) · ResNet18 · EfficientNet-B0 (accurate) |
| 💬 Sentences / reviews | Text Transformer classifier |
| 💬 Longer or harder texts | BERT-style Transformer |
| 💬 Simpler / faster | LSTM · bidirectional GRU · Bag of words (fastest) |
| 🧠 Generate text (write like a book, poems, code…) | Tiny GPT (characters) · GPT-small (words, needs lots of text) · LSTM language model |
| ✎ Design it all yourself | Blank |
You can change any layer after creating the model.
When you create a model, choose 🔍 Unsupervised instead of 🎯 Supervised. These models need no answers: they find structure in your data by themselves.
| You want | Template | Kind |
|---|---|---|
| Groups of similar rows or images | k-means clustering | classic algorithm: fitted in seconds |
| A 2-D map, or fewer columns | PCA | classic algorithm: fitted in one step |
| Oddities, and a map for curved shapes or images | Autoencoder (tables) · Image / Conv autoencoder | neural network: trained with epochs |
- Train: any table or image source works (not text). The label column is optional: if you pick one it is kept aside, never learned from, only used to check the groups. A plain folder of images (no class sub-folders) is enough. For k-means and PCA the Train screen hides the settings that don't apply (learning rate, batch size…) and runs on the CPU.
- Use: shows an example's group (k-means) or rebuild error, and how unusual it is compared with
the training data ("more unusual than 99% of the training examples"). Batch prediction adds
group/rebuild_errorandunusual_percentilecolumns: sort by the last one to find oddities. - Evaluate: silhouette (how clear the groups are) or variation kept (how much survives squeezing), against a do-nothing baseline; a map of the data drawn in the terminal; the 10 most unusual examples; and, with kept-aside labels, how well the groups match them.
New to this? Press g → 3. Supervised, unsup., RL and 🔍 Unsupervised.
Not available yet: the Training script export for unsupervised models. k-means and PCA aren't fine-tuned: training them again on new data takes seconds.
Choose 🎮 Reinforcement when you create a model. An agent learns by trial and error in a built-in world: it tries actions, gets rewards, and learns which actions pay off. No dataset needed.
| World | The agent sees | It can | Rewards |
|---|---|---|---|
| 🧭 GridWorld (3×3 to 12×12, with traps) | where it is, the goal and the traps | step ↑ ↓ ← → | +10 goal · −5 trap · −0.1 per step |
| 🎢 CartPole | cart position and speed, pole angle and spin | push left / right | +1 per step the pole stays up |
- Train: press Set up environment (the preview shows the world and the model's input and output size), then ▶ Start. The model is a Deep Q-Network (DQN): it scores every action and learns from its own memories. Settings: Episodes (attempts), Discount γ (how much later rewards count) and Explore for (share of the run spent trying random actions). The charts show the reward per episode and how often it succeeds. Every 10 episodes the agent is tested without exploring, and the best tested version is kept. Agents train on the CPU (faster for small networks). On a laptop, GridWorld takes a few seconds and CartPole about a minute.
- Use: ▶ Play / ⏭ Step to watch the agent act, with its score for every action. Press the arrow keys to play yourself and compare.
- Evaluate: 100 test episodes against an agent that moves at random on the same episodes: average reward, success rate, how episodes ended, which actions it uses, and the best and worst episode drawn.
First agent? Take the agent tour: press Ctrl+P → Take the agent tour (it is also offered
the first time you open an untrained agent's Train screen). A coach bar walks you through it in 6
steps, highlighting each button: create the agent → see its world → train → watch it play → test it.
It moves on by itself as you do each step. Or read g → 🎮 Reinforcement.
| You see | Meaning | Do this |
|---|---|---|
| Both losses go down and level off | 👍 Learning well | Nothing |
| Train loss down, val loss up | Overfitting (memorizing) | Add Dropout, fewer epochs, Early stop, more data |
| Both stay high | Underfitting | More epochs, bigger model, higher learning rate |
| Lines jump around | Learning rate too high | Lower it (0.001 → 0.0003), or 🔎 Find LR |
| High accuracy, but a rare class is never predicted | Unbalanced classes | Balance classes: on |
Loss is nan |
Training broke | Much lower learning rate, start again |
New to the words (epoch, loss, overfitting…)? Press g → 🎓 ML basics.
| Home | Builder | Train | |||
|---|---|---|---|---|---|
n |
New | a |
Layer list | Ctrl+R |
Start |
i |
Import | Enter |
Add layer | F1 |
Guide panel |
e |
Edit | Del |
Remove layer | < > |
Panel wider / narrower |
t |
Train | Shift+↑/↓ |
Move layer | Esc |
Back |
f |
Fine-tune | Ctrl+D |
Duplicate layer | ||
p |
Use | Ctrl+Z |
Undo | ||
v |
Evaluate | ||||
m |
Compare runs | ||||
x |
Export | Ctrl+S |
Save | ||
a |
Serve (web API) | ||||
s |
Datasets | Ctrl+E |
Explain tab | ||
g |
Guide | ? |
Full guide | ||
F2 |
Guided tour | ||||
w c r d |
Load weights · Duplicate · Rename · Delete |
Everywhere: Esc back · Tab next · Ctrl+P command palette · Ctrl+T dark / light · Ctrl+O report a problem · Ctrl+Q quit.
| Problem | Fix |
|---|---|
command not found: aiforge |
Run python3 -m pipx ensurepath and reopen the terminal (from source: .venv/bin/aiforge) |
| Old models missing after an update | Start AIForge in the folder containing workspace/, or run aiforge -w path/to/workspace |
| Screen looks cut off / odd symbols | Enlarge the terminal (120×35+); use iTerm2 or Windows Terminal with a font like JetBrains Mono |
| "Model input is … but data is …" | Click Auto-fit model to data |
| "Final output must be a flat vector" | Click 🔧 Fix model… and pick a fix |
| Training is slow | Check Training on in the 💻 panel, set Device to auto, or set Max samples to e.g. 5000 |
| GPU "none found" | NVIDIA: install the CUDA build of PyTorch from pytorch.org |
| A dataset download fails | Check your internet and try again; partial files are removed automatically |
| Predictions look random | Make sure the model shows trained and check its validation accuracy |
| Something else is broken | Press Ctrl+O to report it on GitHub, with the details filled in |
Everything lives in one workspace folder: ~/AIForge by default (or ./workspace if it
exists, or aiforge -w <folder> / AIFORGE_WORKSPACE).
AIForge/
├── models/<name>/     spec.json (structure) · weights.pt · history.json · evaluations.json
│                      (+ checkpoint.pt while a run is unfinished, to resume it)
├── exports/           files created by Export and saved evaluation reports
├── data/              downloaded datasets (data/hub/ for the dataset hub)
└── settings.json      your preferences
Every main step also works as a plain command, which is handy on a remote GPU machine, in scripts, or for an overnight run. Commands use the same workspace as the app, so a model trained here shows up there.
aiforge templates                                   # what you can start from
aiforge new spiral -t "mlp classifier"              # a template's number or part of its name
aiforge new houses -g "predict house prices" -d houses.csv   # or say what you want: AIForge picks
aiforge train spiral -d spirals -e 40 --lr 0.005    # toy set, mnist, a .csv/.txt file or an image folder
aiforge predict spiral "0.1, 0.45"                  # or: -f table.csv -o predictions.csv
aiforge evaluate spiral                             # metrics + a saved report
aiforge export spiral -F onnx,bundle                # or: -F all
aiforge serve spiral                                # web API + demo page (see section 11)
aiforge new walker -t gridworld && aiforge train walker -e 300   # an agent learns from rewards
aiforge play walker                                 # watch it play an episode (--steps: every step)
aiforge list| I want to… | Do this |
|---|---|
| Train again on the same data | aiforge train spiral -e 20 (leave out -d) |
| Continue a stopped run (Ctrl+C, crash) where it left off | aiforge train spiral --resume |
| Continue from the saved weights (no unfinished run) | aiforge train spiral --resume -e 20 |
| Fine-tune into a new model | aiforge train spiral -d moons --save-as moons |
| Train a tiny GPT and let it write | aiforge train gpt -d poems.txt then aiforge generate gpt "Once upon" |
| Force full precision / load images with 4 processes | --precision fp32 · --workers 4 |
| Get a learning rate suggested (trains nothing) | aiforge train spiral -d spirals --find-lr |
| Repeat a run exactly / balance rare classes | --seed 42 · --balance |
| Train on a Hugging Face dataset | aiforge train reviews -d hf:imdb (hf:NAME:SUBSET, --split test) |
| Train on an Excel file / a table of image paths | -d sales.xlsx · -d photos.csv (image models; --image-column file) |
| Compare runs (best one gets a ★) | aiforge compare small big --metric val_acc (--last 3) |
| See why it gave an answer | aiforge explain fruit "6.1, 2.7, green" |
| Pick the CSV column to predict | --target price (text classifiers: also --text-column review) |
| Stop early | Ctrl+C: stops after the current batch and keeps the best epoch |
aiforge <command> -h lists every option. Commands exit with code 1 and a one-line message
when something is wrong, so they work in scripts.
aiforge serve turns a trained model into a small web server. You can then try the model on a
web page, or call it from any program (Python, JavaScript, a spreadsheet script…).
This walk-through uses the house-price example that ships with AIForge.
pipx inject aiforge-studio fastapi uvicorn python-multipartInstalled with pip instead? Use pip install "aiforge-studio[serve]".
A model that guesses a house's price from its number of rooms and its area (m²):
aiforge new house-price -t regressor
aiforge train house-price -d <path-to>/house_prices.csv -e 60 --lr 0.01
house_prices.csv is in aiforge/examples/. You can
also do this step in the app: create the model with n, train it with t.
aiforge serve house-priceYou should see:
Serving house-price at http://localhost:8000 (API docs: http://localhost:8000/docs) · Ctrl+C to stop
Leave this terminal open. The server runs until you press Ctrl+C.
In the app: select the model, press a (or 🌐 Serve), then ▶ Start. It stops when
you close that window.
| Open | What you get |
|---|---|
| http://localhost:8000 | A demo page: type 4, 110, click Predict, see the price |
| http://localhost:8000/docs | Every endpoint, with a Try it out button |
Open a second terminal (the first one is running the server).
With curl:
curl -X POST http://localhost:8000/predict \
     -H "Content-Type: application/json" \
     -d '{"input": "4, 110"}'
Answer:
{"predictions": [{"label": "prediction", "score": 420.07}]}With Python (no extra packages needed):
import json
import urllib.request

def predict(text):
    request = urllib.request.Request(
        "http://localhost:8000/predict",
        data=json.dumps({"input": text}).encode(),
        headers={"Content-Type": "application/json"},
    )
    answer = json.load(urllib.request.urlopen(request))
    return answer["predictions"][0]["score"]

print(predict("4, 110"))   # 420.07  → a 4-room, 110 m² house
print(predict("6, 160"))   # 623.18
Many inputs at once: send "inputs" (a list) instead of "input":
curl -X POST http://localhost:8000/predict \
     -H "Content-Type: application/json" \
-d '{"inputs": ["3, 70", "6, 160"]}'{"predictions": [[{"label": "prediction", "score": 291.96}],
[{"label": "prediction", "score": 623.18}]]}The steps are the same; only what you send changes. GET /info always tells you what a model expects.
| Model | Endpoint | Send | You get back |
|---|---|---|---|
| Numbers (CSV table) | POST /predict |
{"input": "4, 110"} |
A value, or each class with its probability |
| Text classifier | POST /predict |
{"input": "I love this movie"} |
[{"label": "pos", "score": 0.89}, …] |
| Images | POST /predict/image |
The image file: curl -F file=@cat.jpg … |
Each class with its probability |
| Language model (tiny GPT) | POST /generate |
{"prompt": "Once upon", "length": 200} |
{"text": "…what it wrote…"} |
| Wrong input? | You get status 422 and a plain message, e.g. {"detail": "Expected 2 values (rooms, area), got 1"} |
| Port 8000 busy? | Pick another: aiforge serve house-price -p 8001 |
| Who can reach it? | Only your computer. --host 0.0.0.0 opens it to your network, and there is no password, so anyone on that network can use the model |
| Check it's running | curl http://localhost:8000/health → {"status": "ok"} |
aiforge/
├── layers.py     layer registry: settings, building, parameter formulas
├── spec.py       model description, workspace storage, templates, code generation
├── data.py       dataset loaders and input preprocessing
├── hub.py        dataset hub: catalog of trusted datasets, download + conversion
├── trainer.py    training / fine-tuning loop
├── pipeline.py   load data → fit model → train → save, without a UI
├── cli.py        the command line (aiforge train / predict / ...)
├── serve.py      web API + demo page (FastAPI), used by `aiforge serve` and the Serve dialog
├── predict.py    single and batch predictions
├── evaluate.py   metrics, baseline, calibration, error analysis, slices, significance tests
├── model_io.py   export and import
├── guide.py      layer encyclopedia, model walk-through, design review
├── learn.py      beginner lessons
├── fixes.py      fixes for models that don't fit the data
├── sysinfo.py    hardware specs and live usage
└── tui/          the Textual interface (one module per screen)
docs/make_screenshots.py   regenerates the README screenshots
docs/make_demo_gif.py      regenerates the demo animation at the top of this README
Tests: pip install -e ".[dev]" && pytest
Release: move the Unreleased notes in CHANGELOG.md under the new version, bump
__version__ in aiforge/__init__.py, merge to main, then push a matching tag
(git tag v0.2.0 && git push origin v0.2.0). GitHub Actions builds it, publishes it to PyPI and
creates the GitHub Release from its CHANGELOG notes (it stops before publishing if there are none).
Every pull request runs the tests on Linux, macOS and Windows first.
Built with PyTorch and Textual · MIT License